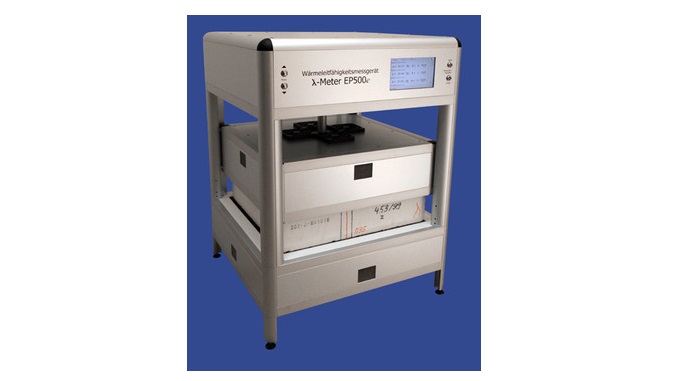
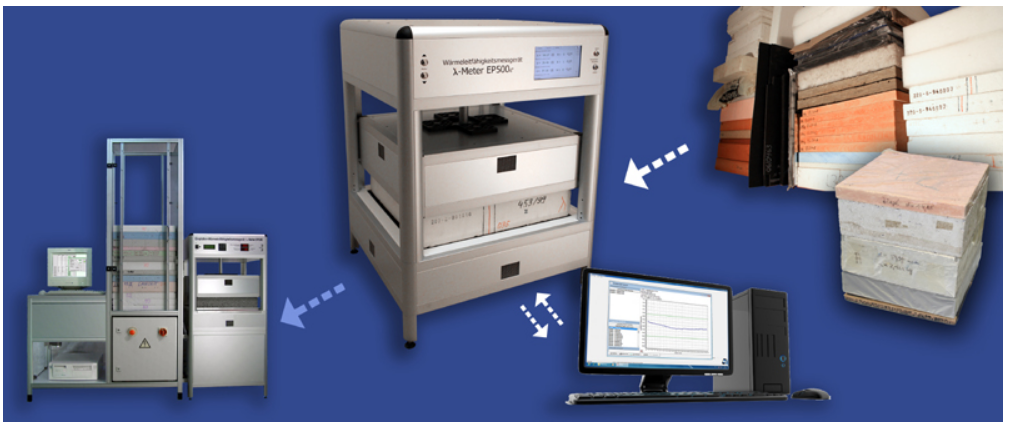
EP500e는 단열재의 열전도도 절대값과 열저항, k-value, U-value 를 측정하는 Guarded Hot Plate (GHP) 열전도도측정기입니다. ISO 8302, EN 12667, ASTM C177에 따르며, 정확도가 높은 시험에 쓰입니다. 측정 시간이 짧아 품질관리 시 auto-loader와 함께 사용하면 매우 효율적인 시험이 가능합니다.
Design and Function of the Guarded Hot Plate Apparatus
The Thermal Conductivity Test Tool λ-Meter EP500e (guarded hot plate apparatus) is a test tool based on an Embedded-PC for absolute value measurements on guarded hot plate method according to ISO 8302, DIN EN 1946-2, DIN EN 12667 and ASTM C177 (DIN 52612). The Thermal Conductivity Test Tool λ-Meter EP500e (guarded hot plate apparatus) measures the sample thickness d of the inserted sample, the temperature difference ΔT over the sample and the heat flux Q which is equivalent to the electrical power of the measuring heating P (= U I). The thermal conductivity is determined based on the defined measurement area A and the one-dimensional thermal conduction as follows:
It is not a heat flow meter and therefore it offers a higher accuracy induced by principle than the most other offered test tools. It is designed for long-term use and does not require calibration even after years.
The use of modern technologies for designing the sensor plates enables to go without a measurement chamber environment, which is standard otherwise. It is therefore easier to handle.
The Thermal Conductivity Test Tool λ-Meter EP500e (guarded hot plate apparatus) does not require a thermo stationary controlled measurement environment. It must be plugged into the regular power supply and can be used in any room or office. It makes very little noise (like a PC) and dissipates very little heat. The advanced control algorithm of the test tool calculates for each measurement the optimal measurement parameters and reduces the measurement time to a minimum.
The Thermal Conductivity Test Tool λ-Meter EP500e (guarded hot plate apparatus) is a compact desktop tool.
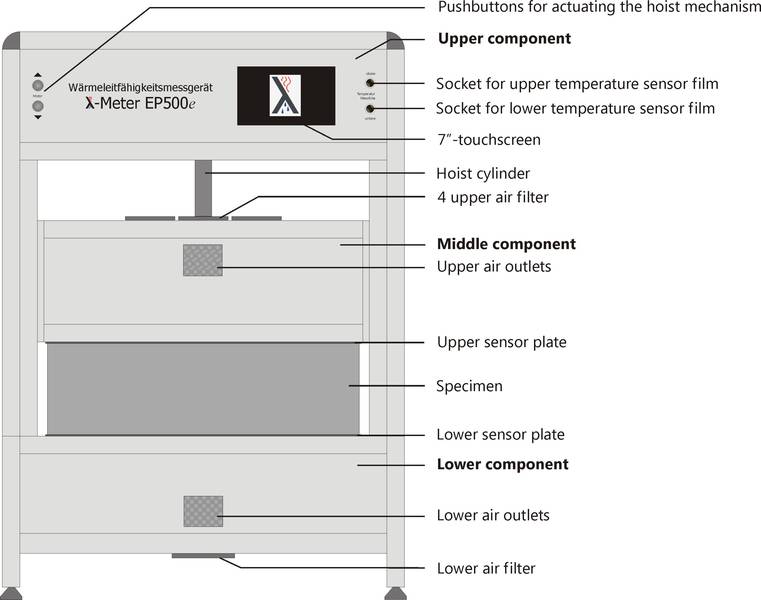
The lower and middle components contain the sensor plates. They are built up concentric. Centrepiece of these plates are computer optimated aluminium units, 40 mm in thickness, required for the maintenance of an isothermal temperature. Air-cooled high-performance Peltier modules are responsible for bringing the temperature of the sensor plates to any temperature between -15°C and 65°C so that thermal conductivity measurements within the temperature range of 10°C and 40 °C at a temperature difference of the sensor plates of 5 K and 15 K can be made. Contrary to other conventional test tools, the temperature measurements on both sample surfaces is done not spotty with thermocouples but cover integrally the entire measurement surface. It ensured such a high measurement accuracy also for inhomogeneous samples.
Ideal specimens are sheets of 500 x 500 mm² in size. The actual testing area of the tool is located right in the centre of the specimen. Its size depends on the type of tool (e.g. 200 x 200 mm²). For a specimen 500 x 500 mm² in size the tool will measure the thermal conductivity that applies to the central area. The adjacent outer material will not be considered for the test result. It is however necessary to have an outer layer. It is needed to bring about thermal conditions that will ensure a one-dimensional, stationary temperature field.
The upper component contains the whole electronic modules, the electrical hoist cylinder for driving the middle component, the measuring instrument for sample thickness and test pressure as well as all display and control units. Handling of the tool is surprisingly convenient and simple. The electric hoist mechanism is managed by the two pushbuttons on the front plate. It will lift the upper sensor plate so that the sample can be inserted. To allow easy insertion, the test tool is sidewise opened. During lowering of the upper sensor plate the hoist mechanism will slow down to a crawl mode – occurred by bottom out of the little pin respectively the coupled light barrier on the lower side of the upper sensor plate. This mode provides higher precision and prevents possible damage. The mechanism is automatically cut-off if the desired test pressure is reached. Measurement of the sample's thickness complies with standards DIN 18164 and DIN 18165 which stipulate the requirement of a specific surface pressure (ranging from 0.05 to 2.5 kN/m² resp. 50 … 2500 Pa) exerted on the sample.
Design and Functions of Sensor Plates - Thermal Conditions within the Specimen by a λ10-test
A single-sample apparatus must have an additional heating plate, a so-called counter heater, situated above the upper sensor plate. This counter heater provides a thermal barrier and makes sure that all heat will dissipate into the sample. The Thermal Conductivity Test Tool λ-Meter EP500e (guarded hot plate apparatus) also includes a highly sensitive heat flux plate used for detection of possible heat convection between heating plate and counter heater. Precise thermal sealing can be achieved, this would not be possible with thermocouples. Deflection of transverse heat between the measurement zone and the protective heating ring is highly advanced and managed as follows: The protective heating ring is not controlled by measurement of temperature difference with only a few thermocouples, but more than 100 thermocouples forming a chain are evenly spread over the gap between the measurement zone and protective heating ring. They can detect even the smallest transverse heat flows. The protective ring will then compensate those unwanted heat flows. It is surrounded by another protective heating ring and again by a cooling resp. tempering ring. Heat flows between the two rings are measured by thermocouple chains (heat flow sensors). The absolute temperature will be measured at various locations. The Thermal Conductivity Test Tool λ-Meter EP500e (guarded hot plate apparatus) will calculate from these data, including the programmed test regime, the sample's thickness and room temperature, the temperature field in the sample and also the control variables for the protective heating rings and the cooling resp. tempering ring.
-
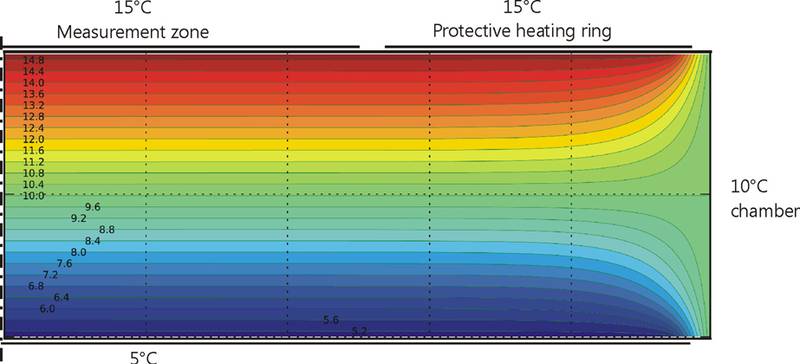
Image 2 - conventional temperature field of a guarded hot plate
The principle figures shown below (Image 3 and Image 4) shall illustrate the thermal conditions within a measured sample for a λ10-measurement of a 120 mm sample taken with two different conductivity measurement tools both according to ISO 8302. The first figure (Image 3) shows the pattern for a conventional guarded hot plate apparatus according to ISO 8302 para. 2.1.3 figure 5 a. The second figure (Image 4) illustrate the temperature field which is induced within the present Thermal Conductivity Test Tool λ-Meter EP500e (guarded hot plate apparatus). It would be the same field, which is induced, if the design according to ISO 8302 para 2.1.3 figure 5 c isupgraded with an additional heating and cooling ring.
An even, one-dimensional and stationary temperature field only exists if the temperature in the lateral zones equals the sample's mean temperature (see Image 3). The another set-up (Image 4) where additional heating and cooling rings on either side of the sample provide a heat barrier and creates such a temperature field that is independent of the lateral conditions (i.e. room temperature) one-dimensional and stationary.
-
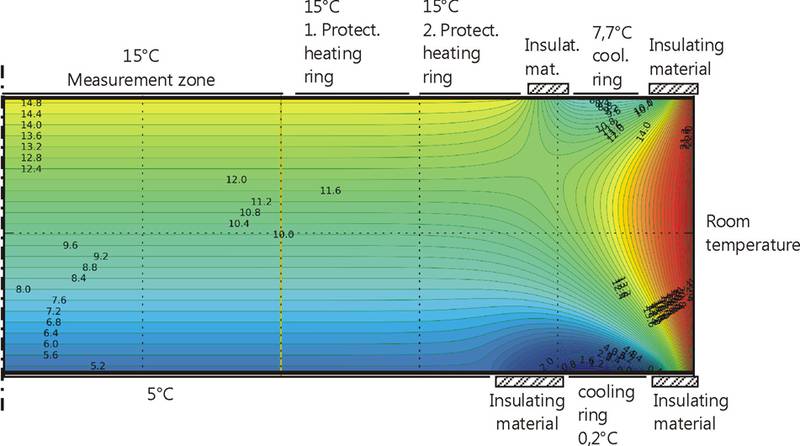
Image 3 - exemplary temperature field of λ-Meter EP500e
For the presented device construction of the Thermal Conductivity Test Tool λ-Meter EP500e (guarded hot plate apparatus) in accordance to ISO 8302, para 2.1.3., fig. 5-c. during a λ10-measurement, the test tool cools down the border area of the sample from both sides in this way that the higher border front surface temperatures (room temperature) will not permeate the inside of the sample. Within the specified ranges of measurement temperature and sample thickness for the test tool, an exact one-dimensional, stationary temperature field will be built up for the range of the measuring heating and protective heating zone. A thermostatic measuring chamber is not necessary for it!
The additional cooling ring functions like a “humidity sink”. Air humidity and eventual humidity in the border area of the sample shift towards the cooling ring and has in this way no influence to the measurement result. Additionally the measurement time will be decrease – both an more decisive advantage in comparison with conventional guarded hot plate apparatus.
An intelligent control mechanism can determine the ideal parameters for a measurement and reduce runtimes. The Thermal Conductivity Test Tool λ-Meter EP500e (guarded hot plate apparatus) can be used in any room and does not require a constant temperature environment.
Characteristics and Operations Scope of the guarded hot plate apparatus λ-Meter EP500e
If you decide to invest in a thermal conductivity test tool you should opt for the guarded hot plate apparatus in accordance with ISO 8302, EN 1946-2. It features major technological improvements compared to the frequently used heat flow meters according to ISO 8301, EN 1946-3.
The single-specimen thermal conductivity test tool λ-Meter EP500e is a guarded hot plate apparatus and measures the thermal conductivity, thermal resistance as well as the k-value and U-value respectively of an insulating material and other products. Tests are done in accordance with ISO 8302, EN 1946-2, EN 12664, EN 12667, EN 12939, ASTM C177 and DIN 52612. and a high accuracy as required by test authorities.
It has been approved for use by test institutes or (higher education) institutes as well as for internal factory production control.
Completely new in the design is that stationary thermal conditions can be achieved in the measurement zone. Three protective heating rings and a thermostatic heating ring (can be used for heating and cooling) are
separated by gap controls and can be controlled individually to allow for convenient handling. The open design has a greater potential for automated solutions. It does not require a thermostatically controlled measurement chamber indispensable for the regular tool-type.
This improvement was accomplished by micro-systems technology and other modern technologies that have been applied to the design of the sensor-plates. The development of a three-dimensional model for the special temperature field also contributed to the success.
An intelligent microprocessor control provides ideal test parameters without manual operations for the internal regulation of the heating and cooling cycles for fast and efficient production of a stationary temperature field within the test zone.
Because the tool is not fitted with a measurement chamber it is often thought that the guarded hot plate apparatus λ-Meter EP500e does not comply with applicable standards. However its conformity to standards ISO 8302, EN 1946-2, EN 12664, EN 12667, EN 12939, ASTM C177 and DIN 52612 have been confirmed and certified.
Both design types, i.e. single-specimen and double-specimen comply with the standards and have been officially approved for CE-certification. We have opted for the manufacturing and sale of the single-specimen test tool. Its technology and engineering are more complex, but it is more user-friendly and easier to operate.
A double-specimen tool type cannot measure the thermal conductivity of a single specimen but only the mean average of two specimens that must be inserted. Specimen insertion and operations are much more convenient with the single-specimen tool type.
The guarded hot plate apparatus λ-Meter EP500e can test the thermal conductivity at exactly the desired test temperature. Its heat control does not switch off when thermal conditions within the specimen are almost stationary to allow for adjusting to the test temperature. This is common for heat flow meters and in most cases leads to marginal differences between real and desired test temperatures. For the evaluation of λ10 on the guarded hot plate apparatus only a single test is needed. This contrasts with a series of up to three different temperatures needed on other tools and formerly required by DIN 52612.
The guarded hot plate apparatus λ-Meter EP500e can automatically complete three subsequent tests on one specimen at different temperatures between 10...40 °C. Based on the individual test results the tool can compute λ10, R10 and TK (temperature coefficient of thermal conductivity) by applying linear regression.
The guarded hot plate apparatus λ-Meter EP500e evaluates specimen thickness or alternatively it can be entered and preset.
The thickness of the specimen on the Thermal Conductivity Test Tool λ-Meter EP500e is measured in accordance to EN 823 (DIN 18164 and 18165 respectively) for a given pressure of between 50 ... 2500 Pa (surface area exertion according to EN 13162 ... 13171 for insulating materials). After insertion of the specimen the upper sensor-plate is lowered until the given pressure is reached. Before reaching its final position the lowering mechanism switches to crawl speed.
It is also possible to enter the specimen thickness (nominal thickness). In that case the upper sense plate will automatically lower to the given level. This may be useful for e.g. extremely soft insulating materials (e.g. mineral wool of low raw density).
The guarded hot plate apparatus λ-Meter EP500e evaluates the thermal conductivity and thermal resistance every 30 seconds in exact accordance with standards (section 5.3.2 of EN 13162...13171) “at the tested thickness”.
The single-specimen Thermal Conductivity Test Tool λ-Meter EP500e has been pre-adjusted to a specific testing range in order to facilitate the testing of insulating and light building materials. This increases accuracy. The relevant ranges are set for test temperatures of 10 °C ... 40 °C, thermal conductivity of λ = 3...500 mW/m·K and a thermal resistance of R = 0,125 ... 5 m²·K/W, based on a temperature difference between the plates of 5...15 K.
The single guarded hot plate apparatus λ-Meter EP500e can be fitted with a second and smaller measurement zone for smaller size specimens of 150 x 150 mm². (R = 0,03...0,25 m²·K/W und λ = 0,25...2,0 W/m·K) This area will activate automatically on insertion and is suitable for materials such as concrete if you want to test them for thermal conductivity and thermal resistance on the tool used for testing insulating materials.
Material specimens of 10 to 200 mm in thickness can be tested on the guarded hot plate apparatus λ-Meter EP500e. With a special option, also thickness smaller than 10mm are possible.
The preferred specimen dimension is 500 x 500 mm², smaller sizes and overlaps to one side and dimension are however possible.
With a special specimen insertion device (can be ordered with tool) loose materials can also be tested.
If the testing temperature is lower than the ambient temperature (especially when testing for λ10) the cooling rings (thermostatic rings) situated on either side edge of the sensor plates serve as humidity traps and prevent the entering of humidity into the testing zone, which would otherwise lead to inaccuracies .
This is particularly useful for specimens that are sensitive to humidity and hydroscopic in nature (e.g. consisting of organic material) and a big advantage over other plate apparatus or heat flow meters.
Compensation pads are needed for testing solid and uneven materials. Temperature sensor films are available for measuring the temperature on the surface specimen between the specimen and the pad layers. They are much more reliable than singular thermocouples used otherwise.
The operation and handling of the guarded hot plate apparatus λ-Meter EP500e is easy and straight-forward. It does not require a special skill or training. Working hours needed for operating the tool are limited.
The guarded hot plate apparatus λ-Meter EP500e does not require a temperature-controlled environment. Any room will do. It does however require mains connection. The test tool is not nosier than a desktop PC and does not develop a lot of heat.
The use of high-performance peltier coolers in combination with an advanced process control for achieving stationary thermal conditions within the specimen ensure that test periods are kept as short as physically possible.
To maximise the use of the guarded hot plate apparatus λ-Meter EP500e a flashlight signalling the test end can be mounted on the tool or elsewhere (e.g. outside the test room) if connected. Similarly a sound alarm can be used.
The single-specimen Thermal Conductivity Test Tool λ-Meter EP500e is reliable over o long period of time. Deviations will not occur even after many years of service.
The principal design of the guarded hot plate apparatus λ-Meter EP500e is modular. It can be modified and upgraded to meet the needs of the owner. Components can be added step-by-step. Full compatibility is guaranteed.
The guarded hot plate apparatus λ-Meter EP500e is offered and supplied together with an enhanced software package that is Windows-based (all versions). This package, called “EP500 - Control Program” facilitates a more convenient handling of the tool. It also includes comprehensive options for evaluation, processing and electronic filing of test results. It’s the key to an all-inclusive and full service.
The guarded hot plate apparatus λ-Meter EP500e has an automatic failure report and analysis system as well as an advanced service software. It is inbuilt in the “EP500 - Control Program”. It processes and selectively transmits relevant data including the time-graphs of all 17 (!) heat and control signals to the tool manufacturer. Transmission is done electronically directly from the tool-linked PC.
Companies that are ISO9000 certified or planning to do so, can ask for a tool configuration that allows regular verification of the accuracy of the guarded hot plate apparatus λ-Meter EP500e. This configuration allows the owner to check and verify anytime that testing of the individual properties and signals needed for evaluation of thermal conductivity is still done with the same accuracy. Those values especially specimen surface temperature, voltage and current of heating plate as well as gap control and counter heater details can be taken and checked by inserting a high-precision digital voltmeter into multi-coloured plugs situated at rear of the tool.
A diagnosis of the tool over distance by Lambda-Meßtechnik GmbH Dresden can also be done. In that case the tool owner will be sent the error analysis report confirming the long-term reliability of the individual test signals that are relevant for the calculation of thermal conductivity. The user then has to output the internal data by using the service module of the "EP500-Control Program" and send it to the tool manufacturer by e-mail.
Technical Data
|
Measurement Mode |
single measurement or series of up to 3 single measurements at different arbitrary temperatures |
|
Measurement Temperature |
freely selectable in the range of 10 °C up to 40 °C |
|
optional |
down to -10 and up to 50 °C |
|
Temperature Difference |
freely selectable in the range of 5 K up to 15 K |
|
Measurement Range |
R = 0,250...14,0 m²·K/W and λ = 1...250 mW/m·K |
|
optional |
R = 0,125...14,0 m²·K/W and λ = 1...500 mW/m·K |
|
optional |
R = 0,025...0,250 m²·K/W and λ = 0,25...2,0 W/m·K |
|
Sample Thickness |
10 up to 120 mm |
|
optional |
Smaller than 10 up to 200 mm |
|
Sample Dimensions |
optimal: 500 x 500 mm², measurement zone size at minimum |
|
Measurement Zone |
selectable: 250 x 250 mm², 200 x 200 mm², 150 x 150 mm² |
|
Reproducibility |
Better than 0,5 % (mostly less than 0,2 %) |
|
Measurement Accuracy |
Better than 1,0 % (mostly less than 0,7 %) |
|
The prototype had been used for comparative tests by the FIW Munich (see no: CE 1-1/99). |
|
|
Dimensions (Length x Width x Height) |
63 x 63 x 88 cm³ |
|
Mass |
ca. 85 kg |
|
Power Supply |
230 V / 50 Hz |
|
Power Consumption |
max. 450 W |
|
Protection Class / Degree of |
I / IP 20 |
|
Cooling-/Heating unit: |
12 air-cooled high performance Peltier modules |
